


Boat
Modifications
Major Systems Anchors
Communications
Electrical
Engine
Plumbing
Refrigeration Sails and Rigging Cockpit
Deck Gear
Interior
Navigation Station Safety
Gear Spares
Stowage

The IP 40 engine room is small but well thought out and the Yanmar engines are very robust. Other than installing a feathering propeller our changes here have been mostly on the order of minor improvements to a good system. The best addition by far was installing an oil change pump. This was accomplished by purchasing a special fitting (referred to as a banjo bolt) which replaces the stock fitting at the base of the dipstick. The fitting connects to a hose that runs to a small 12 V pump mounted on the starboard engine room door. The pump also has a Y on the inlet with another hose that can be used either in the transmission dipstick hole or to suck up oil from the bottom of the engine pan. The coiled outlet hose is simply placed in a suitable jug. Now an oil change takes about 10 minutes and uses 2 paper towels not 2 rolls.
In the Exumas we watched quite a few boats using their engines to motor through narrow cuts in the reef and just at the critical moment their engine would quit. What happened is the cuts were usually much rougher than the ocean so as the boats bounced around in the cut the sediment in the diesel tank got stirred up and went into the line clogging the filter just when the engine was needed most. We have taken several steps to avoid this problem including using Biobor in every bit of fuel we put aboard.
A suction gauge was installed on the Racor primary filter to alert us to a developing problem with a clogged filter. If we notice it in time we simply open up the petcock which we installed on the base of the filter and drain out the contaminants. In the event of a total clog we can turn two Y valves and run the fuel to a backup primary filter that is plumbed in parallel with the standard racor. This allows us to keep the engine running while cleaning the racor. The backup filter may only be used once every few years but if that moment happens to be when entering a dangerous reef strewn pass it will be worth it.
Our boat came only equipped with lights and buzzers but no gauges to alert us to oil pressure or water temperature problems. As the block is drilled for the sending units we needed only to buy the gauges and senders and wire them up. The gauges were installed on the port side of the binnacle.
For information on the installation of the two alternators or voltage regulator click here to read about the electrical system
One work in progress is a plan to turn our empty holding tank into diesel fuel storage for our Pacific crossing. We would not change any plumbing in the boat. Diesel would be added through the deck pump out hose and when needed a small hand or electric pump placed on deck with short hoses would simply pump the fuel back out the deck pump out and into the regular diesel fill. The fuel would go through the Baja Filter as it was added to the main fuel tank. Questions yet to be resolved are the effect of diesel on the plastic and rubber hose fittings in the holding tank and properly cleaning the tank which was last used as a holding tank 5 years ago.
Engine Room Modifications and Additions:
| Feathering Propeller | |
| Oil Change Pump- for crankcase and transmission | |
| Petcock on Racor Primary Filter | |
| Backup Primary fuel filter | |
| Fuel suction gauge | |
| Oil Pressure and Water Temperature Gauges | |
| Alternators & Regulator -see electrical system | |
| Halon Fire Extinguisher | |
| Additional Fuel Bladder- see below for plumbing diagram |
Click on the photo to see a blow-up
of the engine room door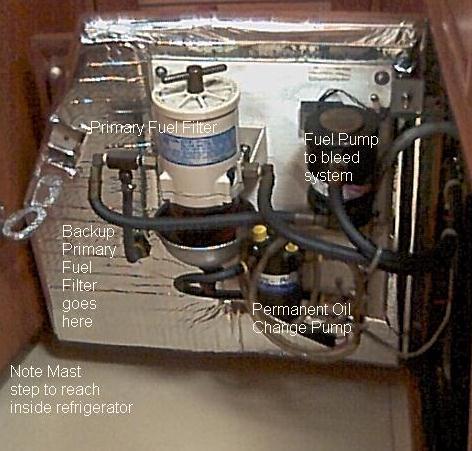 with captions
Click on the plumbing diagram to see a blow-up
Click the back button to return
